
Study FBISE Class 9 Computer Science Unit 3 notes on Programming Fundamentals. These notes include important short questions, long questions and MCQs covering HTML, CSS, JavaScript, debugging and creating dynamic websites.
Unit 3: Programming Fundamentals
Unit 3 covers an introduction to programming fundamentals, HTML, Cascading Style Sheets (CSS), JavaScript, debugging code, and creating a dynamic website.
Important Short Questions and Answers
Q.1) Contrast between website and web application.
Ans: A document which exists and is accessible through the internet is a webpage, while a set of webpages is termed a Website.
On the other hand, a computer program which offers a service or executes tasks via a browser and internet connection, remotely accessing a server, is called a web application.
Q.2) What is ‘href refer to and how to use it?
Ans: The href attribute in HTML stands for “Hypertext Reference” and specifies the destination of a hyperlink. The general syntax for defining a link is like “link text”, where href refers to the address along with the path and link-text is for user information.
Q.3) Enlist the optional parameters to open a webpage.
Here are the common optional parameters for the target attribute:
- _self’: Opens the linked document in the same window/tab (default behaviour).
- _blank’: Opens the linked document in a new window/tab.
- ‘_parent’: Opens the linked document in the parent frame.
- ‘_top’: Opens the linked document in the full body of the window.
- Custom frame name: Opens the linked document in the specified frame.
Q.4) List out the frequent tags used in the text of a webpage and what they are used for.
Ans: Frequent tags used in the text of a webpage include:
- <h1> to <h6>: Headings, with <h1> as the highest level.
- <p>: Paragraphs.
- <b>: To make characters bold
- <i>: Text is shown in italics
- <u>: Underline a text
- <a>: Hyperlinks.
- <br>: Line breaks.
- <ul>: Unordered lists.
- <ol>: Ordered lists.
- <li>: List items.
Q.5) Explain the role of <body> tag-pair in a document.
Ans: The main part of the HTML is the ‘body’. All the main constituents of the HTML document are arranged in the <body> tag-pair.
Q.6) How the event-based code is used in JavaScript?
Ans: Event-based code in JavaScript allows you to create interactive, dynamic web pages by responding to user actions and other events. By attaching event listeners to DOM (Document Object Model) elements, you can define how your application should react when specific events occur, enhancing user experience and functionality.
Q.7) Infer about the External CSS? Where are External CSS generally used?
Ans: External CSS (Cascading Style Sheets) refers to a method of styling web pages where the CSS code is written in a separate file with a CSS extension and linked to HTML documents using the <link> tag.
Usage of External CSS:
Multiple Pages: External CSS is commonly used when styling multiple HTML pages. Instead of repeating CSS code in every HTML file, it’s centralized in one external CSS file.
Ease of Maintenance: It makes updating styles across multiple pages easier. A single change in the external CSS file affects all linked HTML pages.
Faster Loading: External CSS files can be cached by the browser, potentially leading to faster page loading times for subsequent visits to the website.
Important Long Questions and Answers
Q.1) What is the Document Object Model? Explain with the help of an example.
Ans: The Document Object Model (DOM) is a standard which provides mutual interpretation where grammar of a language can be associated with and can coexist on various operating systems. In HTML, every file is interpreted as a DOM-tree where hierarchy of the said file is defined.
Different elements which comprise of a webpage like text, images, etc. are all part of DOM. So when browser reads HTML file it creates the respective DOM automatically and correspondingly correctly displays the page.
‘Document’ comes at the top of the tree for whole webpage. Thereafter comes ‘html’ node which contains the HTML which has two sub-nodes, ‘head’ node that holds title of page and ‘body’ node where the content of HTML are placed like heading, paragraph, unordered list, etc.
Example:
Here’s an explanation with an example:
Consider the following simple HTML document:
<!DOCTYPE html>
<html>
<head>
<title>DOM Example</title>
</head>
<body>
<h1>Welcome to DOM Example</h1>
</body>
</html>
In this example, the DOM is used to dynamically update the content of the webpage in response to user interaction. This demonstrates the core concept of the DOM: providing a structured representation of the document that can be accessed and manipulated using scripting languages like JavaScript.
Q.2) Write code to differentiate between different types of headings in HTML.
Ans: Here’s an example code in HTML that demonstrates the use of different heading levels:
<!DOCTYPE html>
<html>
<head>
<title>Heading Example</title>
</head>
<body>
<h1 > This is a level 1 heading </h1>
<h2> This is a level 2 heading</h2>
<h3>This is a level 3 heading</h3>
<h4> This is a level 4 heading</h4>
<h5> This is a level 5 heading</h5>
<h6>This is a level 6 heading</h6>
</body>
</html>
In this example:
<h1> represents the highest level of heading and is typically used for main headings or page titles.
<h2> represents a level 2 heading and is used for subheadings under the main headings.
Similarly, <h3>, <h4>, <h5>, and <h6> represent lower levels of headings, each decreasing in importance.
By using different heading levels, you can create a structured hierarchy of content on your webpage, which is important for accessibility and search engine optimization.
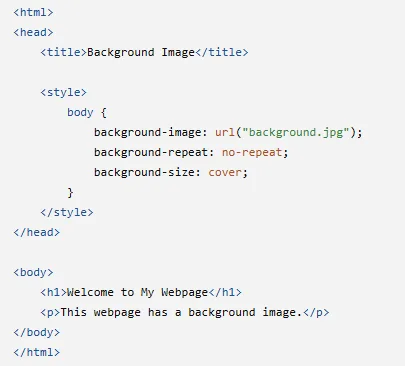
Q.3) Elaborate steps and provide code to load a background image in a webpage.
Ans: To load a background image in a webpage, CSS can be used with the background-image property.
Steps
1. Save the background image in the same folder as the HTML file, for example, background.jpg.
2. Create an HTML file using a text editor.
3. Use the CSS background-image property inside the <style> tag.
4. Specify the image path using url().
5. Save the HTML file and open it in a web browser.
Code:
Q.4) With the help of sample code, highlight different methods to incorporate CSS code in an HTML webpage.
Ans: CSS (Cascading Style Sheets) can be incorporated into an HTML webpage in following three ways.
1. Inline CSS
Any CSS attribute that we want to incorporate can be added using an HTML tag and incorporated in the body section.
<!DOCTYPE html>
<html lang=”en”>
<head>
<title>Inline CSS Example</title>
</head>
<body>
<h1 style=”color: blue; text-align: center;”>This is an Inline CSS Example</h1>
<p style=”font-size: 18px; color: green;”>This paragraph is styled using inline CSS.</p>
</body>
</html>
2. Embedded (Internal) CSS
Instead of assigning styles separately to every heading or component, all styles can be defined in the header under the <style> tag-pair. This separates the presentation-related CSS code from HTML. A change in the CSS section is reflected throughout the respective components
<html>
<head>
<title>Embedded/Internal CSS Example</title>
<style>
h1 {
color: blue;
text-align: center; }
p {
font-size: 18px;
color: green; }
</style>
</head>
<body>
<h1>This is an Internal CSS Example</h1>
<p>This paragraph is styled using internal CSS.</p>
</body>
</html>
3. External CSS
A separate file with the extension .css can be created containing the required CSS code. The CSS file is then attached in the head portion of HTML by passing its link. External CSS is generally used for large projects, such as commercial projects.
Example:
<!DOCTYPE html>
<html>
<head>
<title>External CSS Example</title>
<link rel=”stylesheet” href=”styles.css”>
</head>
<body>
<h1>This is an External CSS Example</h1>
<p>This paragraph is styled using external CSS.</p>
</body>
</html>
Q.5) Sketch steps and provide code to apply border and color to a table in a webpage.
Ans: Here are the steps along with the corresponding HTML and CSS code to apply a border and color to a table in a webpage:
Step 1:Create HTML Table Structure
First, create the HTML structure for your table. This involves using the <table>, <tr> (table row), <th> (table header), and <td> (table data) elements to define the rows and columns of the table.
Step 2: Add Content to the Table
Populate the table with content by adding data within the <th> and <td> elements.
Step 3: Apply CSS for Styling
Define CSS rules to style the table, including setting the border and color properties.
HTML Code:
<html lang=”en”>
<head>
title>Table Example</title>
<style>
table, th, td {
border: 1px solid black;
}
th, td {
background-color: aqua;
}
</style>
</head>
<body>
<table>
<tr>
<th>Student Name</th>
<th>Class</th>
<th>Fee Dues</th>
</tr>
<tr>
<td>Alia</td>
<td>9</td>
<td>200</td>
</tr>
<tr>
<td>Zia</td>
<td>9</td>
<td>0</td>
</tr>
</table>
</body>
</html>
Q.6) Discuss the functionality JavaScript can provide in a webpage with the help of a suitable example code.
Ans: JavaScript is mainly used in the development of webpages and scripts. It is used at the client-end for making webpages dynamic and can easily work with HTML on different operating systems. JavaScript code can be embedded in HTML using the <script> tag-pair.
In programming, an action performed by a user that can be sensed and triggers some task is called an event. In website development, events are an easy way to introduce dynamicity to a webpage. JavaScript provides the alert functionality to inform the user about the result of an action or to give a notification.
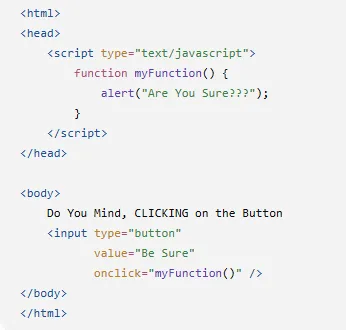
When the “Be Sure” button is clicked, the onclick event calls the function and the message “Are You Sure???” is displayed in an alert box.
Q.7) Articulate steps and write code to create a scrolling text on a webpage.
Ans: To create scrolling text on a webpage, the <marquee> tag can be used.
Steps:
- Create an HTML document using
<html>,<head>and<body>tags. - Write the text to be scrolled inside the
<marquee>tag-pair. - Use the
directionattribute to specify the direction of scrolling, such asleftorright. - Save the file with the
.htmlextension. - Open the file in a web browser to view the scrolling text.
Example Code
<html>
<head>
<title>Scrolling Text</title>
</head>
<body>
<marquee direction=”left”> Welcome to My Website </marquee>
</body>
</html>
Output:
The text “Welcome to My Website” will continuously scroll across the webpage from right to left.
Q.8) Enlist steps to add a video clip in a website which starts playing as the web page loads.
Ans: The <video> tag is used to add a video clip to a website. The autoplay parameter automatically starts the video when the webpage loads.
Steps:
- Use the
<video>tag-pair in the HTML webpage. - Specify the width and height of the video in pixels.
- Use the
autoplayparameter so that the video starts automatically when the webpage loads. - Use the
mutedparameter if the video has to start with the sound muted. - Specify the video file using the
<source>tag with its source (src) and type. - Save the HTML file and open it in a web browser.
Example Code:
<html>
<body>
<video width=”500px” height=”500px” autoplay muted> <source src=”fifa-win.mp4″ type=”video/mp4″ />
</video>
</body>
</html>
Here, autoplay makes the video start automatically as the webpage loads, while muted starts it without sound.
Q.9) Cite steps for compiling the result of your last examination in a tabular form and display it on a webpage.
Ans. HTML provides the <table> tag-pair to organize and display data in tabular form. The <tr> tag defines a row, <th> defines the headings, and <td> is used for the data in the table.
Steps:
- Create an HTML document and define the
<html>,<head>and<body>sections. - Use the
<table>tag to create the result table. - Use
<tr>to create each row of the table. - Use
<th>to define headings such as Subject, Total Marks, Obtained Marks. - Use
<td>to enter the examination result for each subject. - Close the table and HTML tags.
- Save the file with the
.htmlextension and open it in a web browser.
Example Code:
<html>
<head>
<title>Examination Result</title>
</head>
<body>
<h2>My Examination Result</h2>
<table border=”1″>
<tr>
<th>Subject</th>
<th>Total Marks</th>
<th>Obtained Marks</th>
</tr>
<tr>
<td>English</td>
<td>100</td>
<td>85</td>
</tr>
<tr>
<td>Mathematics</td>
<td>100</td>
<td>90</td>
</tr>
<tr>
<td>Computer Science</td>
<td>100</td>
<td>92</td>
</tr>
</table>
</body>
</html>
Q.10) In the context of Fig. 40(d), add another button namely ‘Revert’ which when is pressed, it will reverse both the color and index values.
Ans. To add another button named ‘Revert’ which reverses both the color and index values when pressed, you can follow these steps:
i. Define a new function revert Order() to handle the reverting of the order and color.
ii. Add the new button to the HTML that calls this function when pressed
Here’s the modified code including the new ‘Revert’ button:
<html>
<body>
<script type=”text/javascript”>
var index;
document.write(“For-Loop Starts After This … <br />”);
for(index = 0; index <10; index = index + 1){
document.write(“Index No. :”, index, “<br />”);
}
document.write(“For-Loop Stopped!”);
function descOrder(){
document.body.style.backgroundColor = “peachpuff”;
document.write(“<br /> Index printed in Descending Order: <br />”);
for (index = 10; index > 0; index = index – 1){
document. write(“Index No. :”, index, “<br />”);
}
}
function revertOrder() {
document.body.style.backgroundColor = “white”;
document.write(“<br />Index printed in Ascending Order: <br />”);
for(index = 0; index < 10; index = index + 1){
document.write(“Index No. :”, index, “<br/>”);
}
}
</script>
<p id=”dynamicContent”>Click the button to change the output to Descending Order. </p>.
<button onclick=”descOrder”>Descending Order</button>
<button onclick=”revertOrder()”>Revert</button>
</body>
</html>
Explanation of the changes:
i. The revertOrder() function is defined to reset the background colour to white and print the index numbers in ascending order.
ii. A new button with the text “Revert” is added which calls the revertOrder) function when clicked.
Now, when you press the ‘Revert’ button, it will change the background color back to white and print the index numbers in ascending order, effectively reversing the changes made by the ‘Descending Order’ button.
Unit 3 Multiple Choice Questions (MCQs)
1) Everything in HTML is identified on the basis of
a) Brackets b) Title
c)Tags d) Image
2) The output of HTML code is visible in
a) Notepad b) File
c) Browser d) Spreadsheet
3) The name of a web page can be given using ____ tag.
a) Body b) Title
c) Head d) Footer
4) Main parts of a document are arranged in
a) Head b) Title
c) Body d) Line Break
5) The heading tag-pair for 5″ level heading is
a) <h5 .. h5> b) <h5 .. /h5>
c) h5> .. </h5 d) <h5> .. </h5>
6) Span is used to provide ______ to a line.
a) Font b) Border
c) Style d) Color1)
7) The first row of the table in HTML is called ______
a) Title row b) Top Row
c) Header Row d) Upper Row’
8) p’tag-pair is used for _________.
a) Print b) Page align
c) Page break d) Paragraph
9) A variable cannot start with a
a) Alphabet b) Number
c) Character d) String
10) The first value assigned to a variable after the declaration is called
a) Beginning value b) Starting value
c) Initialization d) Substitution
Continue Studying Class 9 Computer Science
Download the Unit 3 notes, test yourself with the MCQ quiz, or continue to the next chapter.